はじめに
リノシスの神谷です。代表やってます。代表の仕事の1つは落ちてるタスクを拾うことです。最近は社内の複数拠点をつなぐネットワークのお仕事とか、データ周りのインフラのお仕事とか、ラズパイ / Coral (Google の方ね) でゴニョゴニョとか、営業用のデモアプリを突貫で作るとか(最近SwiftとXcodeを覚えました)、デモアプリ用のアセットを作るとか(最近フォトショとイラレを覚えました)、色々あります。
以前にRedashを入れてからちょっと変わっていて引っかかったので改めてまとめます。
EC2上で立ち上げる前提です。
手順
- 公式AMIでEC2インスタンスを作成
- SSL証明書を取得 (Let's encrypt)
- nginx で取得した SSL 証明書を使うように設定
- Google 側で OAuth Client IDを取得
- Redash で Google OAuth の設定
1. 公式AMIでEC2インスタンスを作成
各種クラウド向けに公式イメージがあるので楽。ここ ↓ にまとまってます。
https://redash.io/help/open-source/setup
今回はAWS上( ap-northeast-1 )でに構築するので ami-060741a96307668be を選択。
ググると t2.micro で十分という情報も出てきますが、それだとほぼ動かないので t2.small 以上を選びましょう。(公式に書いてありました。。)
ちなみに ubuntu ベースなので、ssh するときは ubuntu@<ip address> ですね。(よく ec2-user とやって入れず焦ります)
2. SSL証明書を取得 (Let's encrypt)
ELB (ALB) の後ろに入れて Certificate manager でもいいのですが、ELBの値段をケチるため Let's encrypt の理念に日々共感しているので Let's encrypt でいきます。
# Let's encrypt は素晴らしいなぁ
公式AMIでは Dcoker で動いているので、ホスト側に Let's encrypt を入れて、キーのあるディレクトリを Docker 側からマウントする方式でいきます。 certbot のリフレッシュもやる。
手順は以下を参考にさせて頂きました。
certbot の導入
$ sudo apt-get update
$ sudo apt-get install software-properties-common
$ sudo add-apt-repository universe
$ sudo add-apt-repository ppa:certbot/certbot
$ sudo apt-get update
$ sudo apt-get install certbot
certbot-dns-route53 プラグインのインストール
credential の設定も必要なので、ついでに awscli も入れます。
$ sudo apt install python3-pip libssl-dev libffi6
$ sudo pip3 install certbot-dns-route53 awscli
IAM設定
IAM Userでいきます。(ロールでもいいけど、というか本当はロールの方がいいのかな)
https://certbot-dns-route53.readthedocs.io/en/stable/#credentials を参考にポリシーを作成、アタッチしたIAMユーザを作ります。
ちなみにポリシーのサンプル。
{
    "Version": "2012-10-17",
    "Id": "certbot-dns-route53 sample policy",
    "Statement": [
        {
            "Effect": "Allow",
            "Action": [
                "route53:ListHostedZones",
                "route53:GetChange"
            ],
            "Resource": [
                "*"
            ]
        },
        {
            "Effect" : "Allow",
            "Action" : [
                "route53:ChangeResourceRecordSets"
            ],
            "Resource" : [
                "arn:aws:route53:::hostedzone/YOURHOSTEDZONEID"
            ]
        }
    ]
}
credentials の設定
上記で設定したIAMユーザの credentials を設定します。
$ aws configure
証明書取得
ようやく証明書を取得。
$ sudo certbot certonly --dns-route53 \
    -d '*.mydomain.com' \
    --email myname@myemail.com \
    -n \
    --agree-tos \
ここで -d オプションで重複するようなドメイン(例えば *.mydomain.com と www.mydomain.com とか)を指定すると怒られるので注意。
取得した証明書は /etc/letsencrypt/live/mydomain.com 以下に配置される。(正確には /etc/letsencrypt/archive/mydomain.com/ だけど)
更新 (renew) の設定
Ubuntu のパッケージでは定期実行まで設定してくれる。証明書の更新までは良いが、当然ながら nginx もリロードしないといけないので、 post-hook で設定。
$ EDITOR=vim sudo -E systemctl edit certbot.service
設定内容は以下。Redash が Docker 上で動いているので docker-compose kill -s HUP を使う。
[Service]
ExecStart=/usr/bin/certbot -q renew --post-hook "cd /opt/redash/ && /usr/local/bin/docker-compose kill -s HUP nginx"
編集完了したらリロード。
$ sudo systemctl daemon-reload
これで一通り Let's encrypt の設定は終わり。
3. nginx で取得した SSL 証明書を使うように設定
ようやく折り返し地点。
基本、以下の公式に従えばよいのですが、1点だけ追記しないとこの後 SSO 化で困るので注意。
https://gist.github.com/arikfr/64c9ff8d2f2b703d4e44fe9e45a7730e
nginx.conf の設定
$ sudo mkdir /opt/redash/nginx
$ vi /opt/redash/nginx/nginx.conf
nginx.conf の中身は以下。
upstream redash {
  server redash:5000;
}

server {
    listen      80;
    listen [::]:80;
    server_name redash.example.com;

    location ^~ /ping {
        proxy_set_header Host $http_host;
        proxy_set_header X-Real-IP $remote_addr;
        proxy_set_header X-Forwarded-For $proxy_add_x_forwarded_for;
        proxy_set_header X-Forwarded-Proto $http_x_forwarded_proto;

        proxy_pass       http://redash;
    }

    location / {
        rewrite ^ https://$host$request_uri? permanent;
    }

    location ^~ /.well-known {
        allow all;
        root  /data/letsencrypt/;
    }
}

server {
    listen      443           ssl http2;
    listen [::]:443           ssl http2;
    server_name               redash.example.com;

    add_header                Strict-Transport-Security "max-age=31536000" always;

    ssl_session_cache         shared:SSL:20m;
    ssl_session_timeout       10m;

    ssl_protocols             TLSv1 TLSv1.1 TLSv1.2;
    ssl_prefer_server_ciphers on;
    ssl_ciphers               "ECDH+AESGCM:ECDH+AES256:ECDH+AES128:!ADH:!AECDH:!MD5;";

    ssl_stapling              on;
    ssl_stapling_verify       on;
    resolver                  8.8.8.8 8.8.4.4;

    ssl_certificate           /etc/letsencrypt/live/redash.example.com/fullchain.pem;
    ssl_certificate_key       /etc/letsencrypt/live/redash.example.com/privkey.pem;
    ssl_trusted_certificate   /etc/letsencrypt/live/redash.example.com/chain.pem;

    access_log                /dev/stdout;
    error_log                 /dev/stderr info;

    # other configs

    location / {
        proxy_set_header Host $http_host;
        proxy_set_header X-Real-IP $remote_addr;
        proxy_set_header X-Forwarded-For $proxy_add_x_forwarded_for;
        proxy_set_header X-Forwarded-Proto $http_x_forwarded_proto;
        proxy_set_header X-Forwarded-Proto $scheme;

        proxy_pass       http://redash;
    }
}
61行目に
proxy_set_header X-Forwarded-Proto $scheme;
という設定を追加しているのですが、これをしないと SSO 化で redirect_uri が http:// になってしまうのでこの設定を忘れずに。(この設定、ざっと見たけど公式に書いてなかった。その他色々URLの生成に https が使われなくなるとかおかしくなるみたい。)
docker-compose.yml の設定
nginx部分を以下のように設定。
nginx:
 image: nginx:latest
 ports:
   - "80:80"
   - "443:443"
 depends_on:
   - server
 links:
   - server:redash
 volumes:
   - /opt/redash/nginx/nginx.conf:/etc/nginx/conf.d/default.conf
   - /etc/letsencrypt:/etc/letsencrypt
 restart: always
その後リスタート。
$ docker-compose up -d
4. Google 側で OAuth Client IDを取得
これも公式を参考に設定。
https://redash.io/help/open-source/setup#Google-OAuth-Setup
OAuth 同意画面の設定
以下のように設定する。プロジェクトがまだ無い場合は新規作成してから。ここでは社内向けなので、アプリケーションの種類は内部で設定。

画面の下の方にある承認済みドメインに redash で使うドメインを設定するのを忘れないように。
最後保存ボタンを押すのも忘れがちなので注意。(自分が忘れてたw)
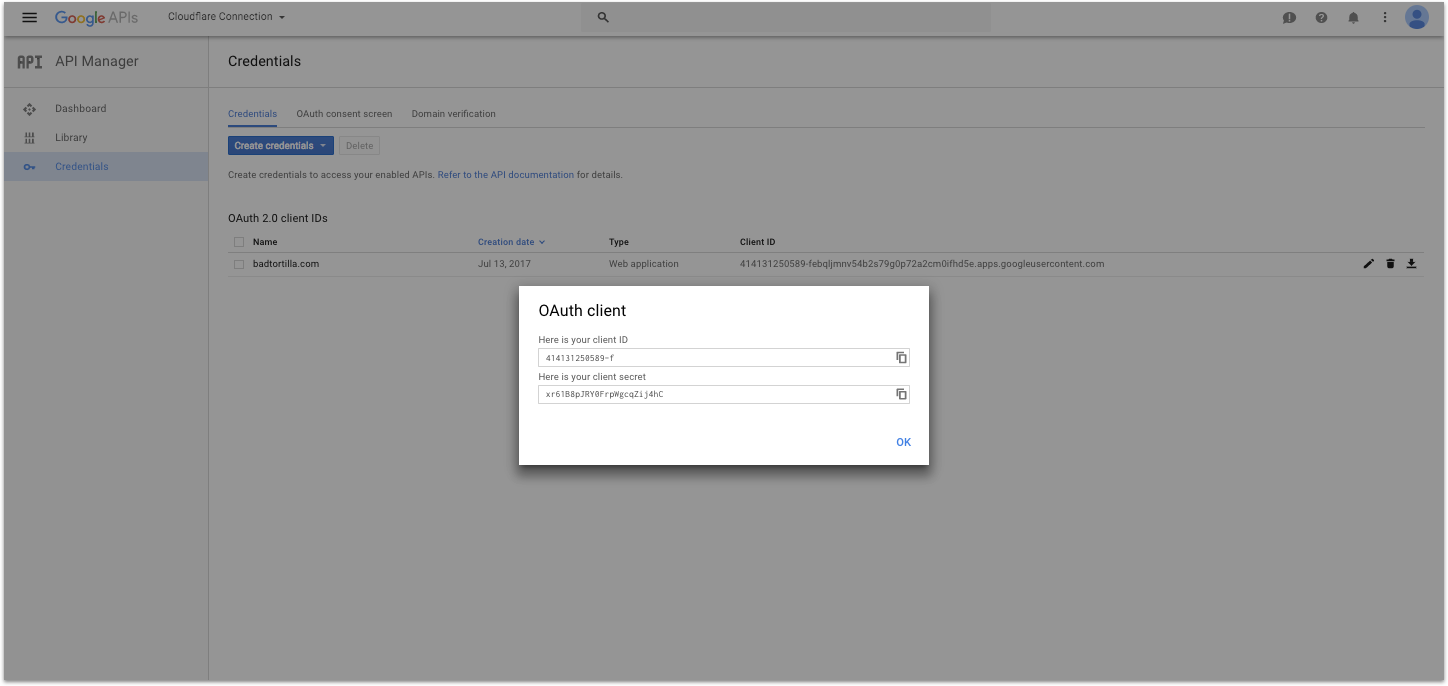
OAuth client ID の作成
認証情報作成画面から「認証情報を作成」ボタンをクリック。OAuth クライアントIDを選択。

ウェブアプリケーションを選択し、以下のように入力。redash.example.com の部分は適宜変えてください。(無効な生成元、と出てますが、OAuth 同意画面の設定できちんと承認済みドメインの設定をしていれば出ないはず)

無事作成できると client ID と secret が表示されるので、メモしておく。
5. Redash で Google OAuth の設定
これも公式通りに進めていく。
https://redash.io/help/open-source/setup#Google-OAuth-Setup
$ sudo vi /opt/redash/env
先ほどメモった ID と secret を設定。
REDASH_GOOGLE_CLIENT_ID=REDASH_GOOGLE_CLIENT_SECRET=
そしてDockerリスタート。
S sudo docker-compose up -d server
Redash の settings 画面から許可ドメインを設定して終わり。


Login with Google の文字が!
お疲れさまでした。